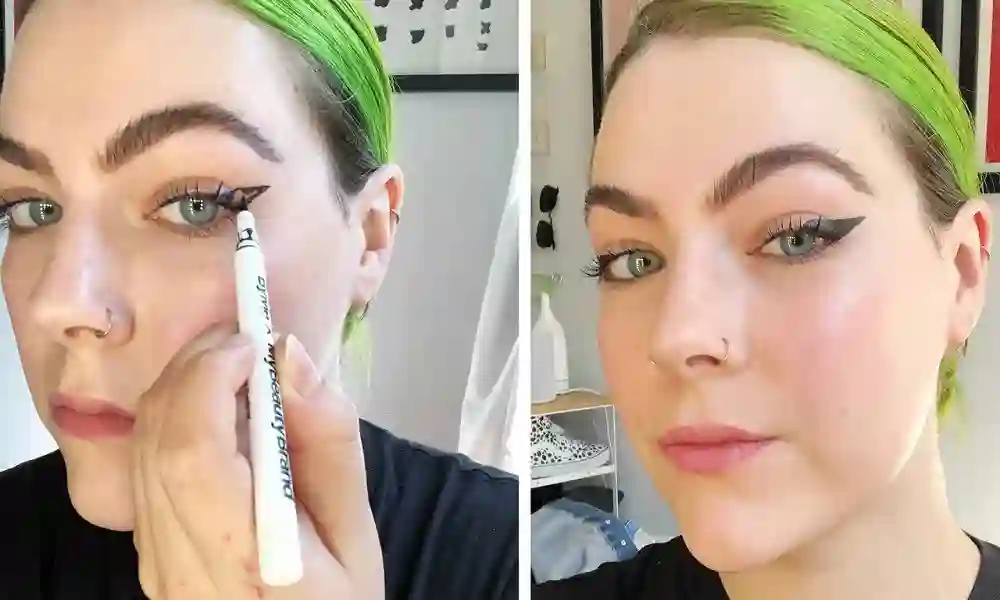
How to Achieve a Perfectly Defined Cat Eye Makeup Look
If you’ve ever seen a cat eye and thought, “That looks wicked,” but then tried it yourself and ended up looking like you’d just survived a windstorm—yep, been there. But don’t stress, because mastering the perfect cat eye is totally doable. I’m not saying you’ll be the next beauty guru on TikTok (unless you’re into that), but you can definitely pull off a killer cat eye that’ll make you feel like you’ve got your life together. Trust me, after three eyeliner smudges, I figured it out. Now, let me share how you can achieve a perfectly defined cat eye—minus the panic.
What Even is a Cat Eye, Anyway?
A cat eye. That flicked-out eyeliner look that somehow makes you feel like you’re channeling your inner Audrey Hepburn, or at least a very glam cat. Essentially, it’s a sharp wing of eyeliner that extends out from the outer corner of your eye, pointing upward like a little arrow. It elongates the eyes and adds drama—hello, confidence boost! You might wonder if this is only for certain eye shapes. Well, I once saw my friend Marissa, who’s got tiny almond-shaped eyes, pull off a killer cat eye, and now I’m here, living proof you can achieve a perfectly defined cat eye on any eye shape.
What You’ll Need
Before you even think about eyeliner, take a breath. This isn’t rocket science—well, kind of—but it’s manageable with the right tools. Here’s your list:
- Eyeliner: Whether you go for liquid, gel, or pencil depends on your vibe. I’ve tried them all—liquid works best for precision, but gel’s great if you want to go smokier.
- Angled Brush: For the gel liners, you’ll want a little angled brush to carve out that wing.
- Eye Primer: This stuff keeps everything from smudging. Seriously. Don’t skip it unless you want to deal with panda eyes by noon.
- Mascara: Because what’s a cat eye without lashes that say, “I woke up like this”? (I definitely don’t, but you get it.)
- Concealer: To fix any small hiccups—sometimes a little spill happens, right? Just me? Okay.
- Makeup Remover: You’ll need this for fixing those oops moments. They happen. Don’t worry.
With these in hand, you’re ready to start. You might even feel like a makeup pro already.
Step-by-Step: How to Achieve a Perfectly Defined Cat Eye
Ready? Here we go. Just a heads up: there’s no perfect, one-size-fits-all technique here. It’s all about making adjustments and not stressing over a teeny-tiny mistake. You got this.
Step 1: Prep Those Lids
Step one: prep or regret. I’ve skipped this before. Never again. Start with clean, dry eyelids. If you don’t prep properly, your eyeliner will start running faster than your attempts at staying off social media.
- First, wash your face and pat your eyelids dry.
- Prime your eyelids. I don’t care if you think you don’t need it—you do. Trust me, I learned that lesson the hard way after one too many eyeliner smudges. (RIP, my favorite beige top.)
- Set the primer with a bit of translucent powder. Just a light dusting. I do this, even though my cat eye is never going to be 100% perfect. It still works.
Step 2: Line Your Upper Lash Line
So, you’ve prepped. Now it’s time to make the magic happen. You’ve got to create the base of the cat eye first.
- Use your eyeliner (liquid, gel, whatever feels best).
- Start from the inner corner of your eye and draw a thin line along your upper lash line. Keep it close to the lashes—no gaps. If there’s one thing I learned about this look, it’s that smooth lines are key. So don’t go too thick just yet.
- Make it look like you’re adding a subtle eyeliner, but don’t worry about the wing yet. It’ll come later.
This first line is all about creating a smooth base. I’m talking the kind of base that’ll make the rest of your makeup look, “Oh, wow, she’s on top of her game.”
Step 3: Time for the Wing
Oh boy. The wing. The one that has sent me spiraling more than once. But listen, it’s not as complicated as it seems. You got this.
- Find the angle. Imagine your lower lash line extending upwards toward the tail of your eyebrow. Now, flick your eyeliner from the outer corner of your eye, creating a wing that follows that angle.
- Start small. Trust me, I’ve gone overboard and ended up looking like I was auditioning for a superhero movie. A tiny flick is enough to start.
- Pro tip: Use tape. Seriously. Put a little piece along the bottom edge of your eye as a guide. This was a game-changer for me, especially when I was still learning.
I know, I know. You might think you’ve messed it up. Fast forward past three failed attempts—I promise it’ll come together. Stick with it.
Step 4: Connect the Wing to the Lash Line
Once you have your wing, you need to connect it back to the top lash line. This part is crucial for that smooth, continuous look.
- From the tip of your wing, draw a line back toward the middle of your eyelid. Fill in any gaps.
- This is where you can go a bit thicker if you like, but don’t make the lines too chunky. You still want a defined look that doesn’t overwhelm your face.
Now, just breathe. I get it. My first attempt at this? It looked like a toddler tried to paint me. But with a little patience and some concealer to clean it up, I eventually achieved a perfectly defined cat eye.
Step 5: Mascara, Baby
Now that your cat eye is all set up, let’s finish this look off. You need mascara to make those lashes pop. Here’s what I do:
- First, curl your lashes—don’t skip this, or you’ll regret it. I learned that the hard way on a very awkward date.
- Apply mascara to your top and bottom lashes. You want that dramatic lash look to really bring the whole eye together.
- If you’re feeling fancy, you can add falsies. I’ve done that for special occasions. My first experience with them? I ended up gluing my eyelashes together. Not my finest moment.
Step 6: Final Touches
Okay, so maybe there’s a little cleanup needed. Eyeliner’s tricky, and I’ve made my share of mistakes.
- If you messed up, use a cotton swab with makeup remover to clean up the lines. Sometimes, it’s just about smoothing things out.
- You can also use concealer to sharpen the edges of your wing. I do this for a perfectly defined look every time.
Now, step back and admire your work. It took a few tries, didn’t it? But here we are, at the end with those wings that make you feel like a million bucks.
Tips to Achieve a Perfectly Defined Cat Eye
Listen, I’m not going to pretend like I’m the queen of eyeliner. There’s always something to learn. But over time, I’ve picked up a few tricks to make this whole cat eye thing way easier:
- Use tape for precision. I swear by it. My first attempts were nothing like the smooth lines I have now, but tape was a game-changer.
- Practice makes perfect. I’ve had more failed cat eyes than I’d like to admit. It’s okay. Really. Just keep practicing.
- Don’t overdo it on the rest of the makeup. Keep your foundation and blush subtle. A dramatic cat eye doesn’t need to compete with bold lips or cheeks.
And don’t forget—makeup’s fun! It’s about self-expression, not perfection. Don’t get caught up in the little mistakes. (I promise, no one will notice that tiny smudge you’re freaking out over.)
Wrapping It Up
And there you have it—how to achieve a perfectly defined cat eye. It’s a little tricky at first, but once you get the hang of it, you’ll be flaunting those wings like you just walked off the runway. Stick with it, and soon enough, your cat eye will be so on-point, people will be asking for your secrets. (Just make sure you tell them about the tape trick—it’s a life-saver.)